Z-Buffer - the backbone of the 3-D rendering
Published on
TL;DR - A Z-buffer (depth buffer) keeps, for every screen pixel, the distance to the closest object rendered so far. Any time a later fragment tries to draw to the same pixel we compare depths; only the nearer fragment survives. The idea is so simple that you can implement it in ~40 lines of vanilla JavaScript and render a spinning 3-D torus entirely out of ASCII characters.
Below I'll dissect the code behind the 3D ASCII Donut demo (GitHub), see how it builds and resets its Z-buffer each frame, and learn a few tricks (cheap lighting, parameterized surfaces, time-based animation) along the way.
Setting the stage
<pre id="output" style="font-size:7px; font-weight:bold;"></pre>
<pre> gives us a fixed-width text canvas. Each pair of characters will act like a square pixel,
so a 70x35 ASCII grid feels roughly VGA-sized.
The user changes four parameters with range sliders:
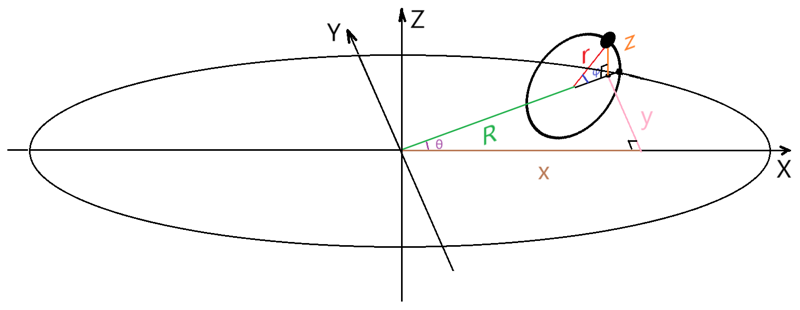
outer radius R         // distance from donut centre to tube centre
inner radius r         // radius of the tube itself
outerCoverage (θ_max)  // how much of the big circle to draw
innerCoverage (φ_max)  // how much of the small circle to draw
Any time a slider moves we call refreshSizes(), which:
-
Re-reads the four inputs.
-
Computes
size = 2 x (R + r) + 10- a safe bounding box that fits the torus plus some margin. -
Allocates
zBuffer[size][size]and fills it with zeroes.
We use a full 2-D array instead of a 1-D list because the math is easier to read and JavaScript's optimizer doesn't really care at these sizes.
Marching around the torus surface
A torus is the Cartesian product of two circles:
- φ runs around the tube.
- θ spins that tube around the big circle.
For each (φ, θ) pair we calculate the 3-D point:
x = (R + r cos φ) cos θ
y = (R + r cos φ) sin θ
z = r sin φ
In code:
for (let φ = 0; φ <= φ_max; φ += innerStep) {
  const radius = R + r * Math.cos(φ);
  const z      = r * Math.sin(φ);

  for (let θ = 0; θ <= θ_max; θ += outerStep) {
    const x = radius * Math.cos(θ);
    const y = radius * Math.sin(θ);
    // …
  }
}
innerStep and outerStep are chosen so we take about size / 5 samples
along each ring—enough that no holes appear at the current font size.
Two tiny rotations = one relaxed camera
Instead of a full view matrix we fake a camera by rotating the torus around two axes:
// spin around x-axis
const y1 = y * cos(α) - z * sin(α);
const z1 = y * sin(α) + z * cos(α);

// then around z-axis (like a top-down turntable)
const x2 =  x       * cos(β) - y1 * sin(β);
const y2 =  x       * sin(β) + y1 * cos(β);
α and β (called xyPlaneAngle and projectionRotationAngle in
the demo) are slowly incremented every frame so the
donut tumbles in space.
Perspective-ish projection
Because we're rendering to ASCII we can cheat: a simple orthographic projection with a depth bias is enough to feel 3-D.
const screenX = Math.round(x2) + size / 2;
const screenY = Math.round(y2) + size / 2;
const depth   = z1 + size;     // make every z positive
Now each sample knows where it wants to land in the output grid and how far away it is.
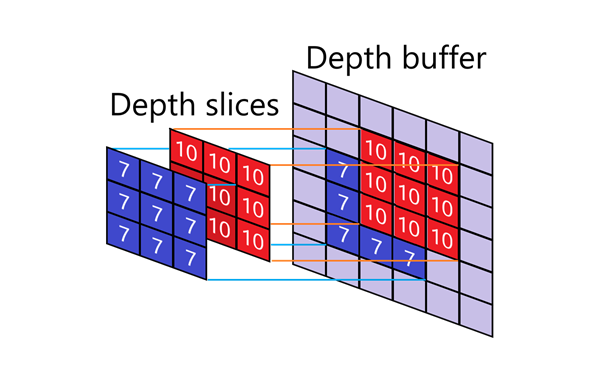
The heartbeat - Z-buffer test
if (depth > zBuffer[screenY][screenX]) {
    zBuffer[screenY][screenX] = depth;
}
- At the start of the frame every Z entry is zero.
-
Only the point with the greatest depth value survives (remember we added
size, so numerically larger depth ≈ closer to camera). - We don't store color yet-just the depth.
That single if implements hidden-surface removal: whichever bit of torus is closest to the viewer
wins.
Converting depth differences into brightness
After all samples are processed we walk through the finished Z-buffer:
let angleCoeff = 2*z - zBelow - zRight;
angleCoeff     = (size * angleCoeff) / 12;
angleCoeff     = clamp(round(angleCoeff), 0, gradient.length‑1);
angleCoeff roughly measures the local slope: front faces differ less from neighbors than side
faces, so the
value is small for "bright" areas and large for "dark" ones.
Finally we index into a tiny luminance gradient:
const gradient = ['.', '"', '?', '%', '%', '#', '@'];
s += gradient[angleCoeff] + gradient[angleCoeff];
Duplicating the character horizontally re-squares the aspect ratio (most monospaced glyphs are taller than they are wide).
Animation loop
setInterval(() => {
  if (frame % 10 === 0) {          // every 10 frames shake things up
      incα = 0.03 + Math.random()/10;
      incβ = (Math.random() - 0.5)/10;
  }
  α += incα;
  β += incβ;
  renderTorus(α, β);
  ++frame;
}, 20);
20 ms per tick ≈ 50 FPS. Every ten frames we randomize the angular velocities so the motion feels organic.
renderTorus flushes output.innerText with the freshly-drawn string, the
<pre> repaints, and the donut spins on.
Why the Z-buffer scales
Even in a "real" rasterizer the logic is essentially the same:
- Initialize a 2-D depth array once per frame.
- For every triangle fragment, compare its interpolated depth to the stored depth.
- Keep the nearer fragment and optionally write color.
Complexity is O(pixels) - independent of scene geometry density - which is why Z-buffering
conquered graphics
hardware in the 1990s and still reigns today.
Our toy swaps triangles for parametric samples, colors for ASCII glyphs, but relies on the exact same hidden-surface test.
Takeaways
- A Z-buffer is the simplest, most reliable hidden-surface algorithm.
- You don't need matrices, shaders or GPUs to appreciate it - a
<pre>tag and 100 lines of JS suffice. - Post-processing (slope-based brightness, double-width glyphs) sells the illusion of continuous shading.
Next time you watch a AAA game or scroll Google Maps in 3-D remember: every frame, billions of fragments still
perform that humble depth comparison we just coded in one if.